

This month's Daring Bakers Challenge (my first participation in a while) was extremely exciting for me: doughnuts! I've always wanted to try my hand at doughnut making, and I even have one of those baked doughnut pans although I've yet to use it. For this challenge, I decided to give it a try, and I decided to fry them, despite having never deep-fried anything in my entire life. This process was a definite learning experience, but a lot of fun, and the doughnuts were super-tasty.
I chose apple cider as the doughnut flavor I wanted to make, which leads us to another historical Halloween interlude:
Bobbing for Apples
Apple bobbing, the practice of diving for apples submerged in buckets of water, and pulling them out with one's teeth, has a long history -- over 2000 years of it! The Romans conquered Britain in circa 43 A.D., and when they did so, they brought many Roman customs and traditions with them. One such tradition was the festival of Feralia, a public celebration of the Manes (Roman spirits of the dead) which marked the end of the Parentalia feast honoring dead ancestors. The second custom was the worship of Pomona, the Roman goddess of plenty, namely fruit and fertility. Worship of Pomona was especially prevalent during the Roman harvest season. Although Feralia was held at the end of February in Rome, eventually both Feralia and Pomona worship became merged with the Celtic harvest festival of Samhain in Britain. Apples in particular were of special mystical significance, because if one cuts an apple in half, there is a pentagram clearly visible, studded with apple seeds. The belief that apples were tied to fertility and could predict the future led to the superstitions that the first person to successfully bob for an apple would be the first to marry.
As another interesting historical aside: when English settlers first came to America in the late16th and early 17th centuries, they found only crab apple trees, which are indigenous only to North America. The colonists brought seeds with them to plant apple trees, but these early orchards were largely failures because there were no honey bees to pollinate the blossoms. In 1622, the first shipment of honey bee colonies to the New World landed in the Colony of Virginia, with additional shipments of honey bees landing in Massachusetts Bay in subsequent years.
Cider Donuts
I decided to make apple cider doughnuts, because to me, it is one of the most definitive Autumn foods. There really is nothing like a warm apple cider doughnut on a crisp Fall day at an orchard while you pick pumpkins and/or apples. So, I decided to try and replicate the cider doughnuts at my local orchard, and to do it, I modified a cider donut recipe from Smitten Kitchen.
This recipe isn't hard, but it can be time-consuming, and it definitely isn't a "one-bowl" recipe. The key is to have all of your equipment and ingredients out and ready to go, so you're not scrambling later on.
 The first thing you need is some good-quality apple cider. I got mine at my local orchard.
You then take a cup and a half of this cider, and reduce it down to 1/4 C. It is hard to judge how much volume you have in the pan, but when it doubt, it is better to reduce it to a smaller volume than you need rather than leave it at a bigger volume -- if you end up with less than 1/4C of reduced cider, you can always bring the volume up with unreduced cider if need be. When I was doing this, it was getting late, so I reduced the cider, covered it and stuck it in the fridge overnight. You can do the same, and it'll shave a little time off of the entire process.

If you need to clabber milk to make buttermilk (1/2 tbls of lemon juice or white vinegar in 1/2 C milk for 10 minutes), now would be the time
Then, cream together softened butter and sugar until light and fluffy.

Then, add the reduced cider, buttermilk, and vanilla to the mixture on low, and beat until just combined.
Add in the flour in gradually (can do in batches of 2 or 3), and beat until just combined
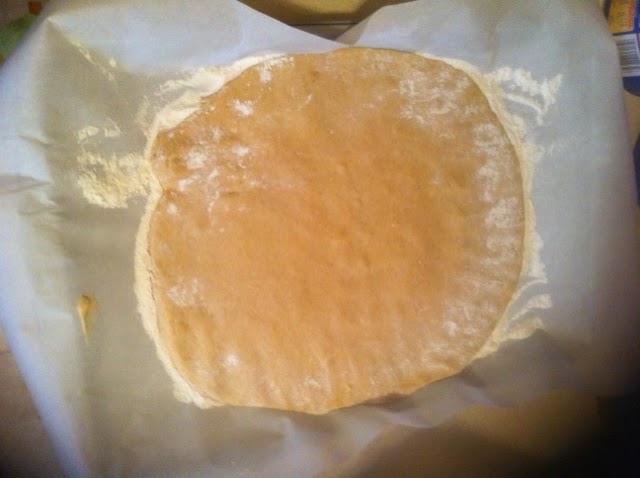
Then, parchment line and generously flour 2 cookie sheets. Take your dough, and deposit it on one of the cookie sheets, sprinkling flour on the top of the dough and on your hands. Pat the dough down in a rough rectangle until it is about 1/2 inch thick. Add more flour to your hands and to the top of the dough if it is a little sticky.
This dough needs to firm up in the freezer for about 30 minutes. The surface of the dough should be stiffening when you pull it out. You have 2 basic options for cutting the dough: 2 circular cutters from a set of biscuit cutters, or a doughnut cutter. For this recipe, I used the 3" biscuit cutter on the left, and a second 1" cutter to make the holes. I did this because the only doughnut cutter I could find was 2.5" and I wanted something a little larger. In retrospect, 2.5" would have been fine too.

Take these cutters and carefully cut your holes in the dough. Make sure to flour your cutters or the dough will stick. I found that a nice side-to-side turning motion once you've cut down to the bottom of the dough helps release the dough from the cutter.

Then, you carefully transfer the doughnuts and holes to the second cookie sheet. If the dough seems to be too soft, pop the dough back in the freezer for 10 minutes before you try transferring them.

Once the doughnuts are on the second sheet, pop them into the fridge for a half hour or so. If you have leftover dough, you can repeat the process, re-chilling in between. In the meantime, now is a good time to get the oil heating. You want to assemble a deep pot with a deep frying thermometer attached to the side, with the probe end deep down but not touching the bottom of the pot.

For this recipe I used solid Crisco shortening as per a suggestion by Smitten Kitchen that using solid shortening will make the end product less greasy since it is solid at room temperature. But you can use whatever oil you feel comfortable with -- just be sure to research the flash point of whatever you are planning to use (i.e. the temperature at which the oil becomes ignitable). You want enough oil to be 2-3" deep in the pan. The temperature range you are shooting for to fry the doughnuts is somewhere between 350F and 365F -- if the oil is too cool, the dough will absorb too much, and if it is too hot, the outside will cook too fast, leaving a raw doughy center.
It'll take a little while for the oil to melt and come up to temperature, so now is a good time to think about doughnut toppings. These doughnuts happen to taste great bare, but here are 2 different potential toppings you might want to try (recipes below): cider glaze (confectioner's sugar and cider); and cinnamon sugar.


Now is also a good time to prepare a blotting station for the newly-fried doughnuts. You can reuse that first cookie sheet that you used to pat the dough onto -- just line it with fresh parchment and add several layers of paper towels.
I have a confession to make: my oil was probably closer to 325F, but I was getting impatient so I started frying. They turned out great, and they didn't absorb too much oil -- I'm not sure if this was a function of using solid shortening, or a function of an uncalibrated thermometer, or perhaps a function of the fungible nature of deep frying...
If you're not sure whether the oil is at the right temperature, test it out on one of the doughnut holes. Give it a few minutes after it comes out of the oil and drains before you cut it open to have a looksie. If it is cooked through without being oil-logged or burned on the outside, you are good to go.

When you are done, you end up with a doughnut, after it has blotted and cooled enough to handle (they are hot when they come out of the oil!!), that is ready for a topping. Topping is best done while the doughnut is still warm. Whether you dip just the tops of the doughnuts or the whole doughnut (as I did) is totally up to you!
Cinnamon sugar:

And cider glazed:

As you can guess, I made more cinnamon sugar doughnuts than cider glazed ones, because that is how I traditionally see cider doughnuts topped...but I have to say that I really liked the glazed ones too! They both are great for different reasons: the glaze really brings out the taste of cider, while the sugar ones have that great texture. The people who sampled my doughnuts were split down the middle 50/50 on which topping they liked better, so my advice is to split the batch evenly between the two toppings. I've been mulling over combining the two (glazing and then dipping in cinnamon sugar), but I'm not sure if this would be a little too sweet.
All in all, this challenge was a complete success. This recipe yields doughnuts that are satisfyingly apple cidery, and taste even better than ones from an orchard. The process is a little involved (so is the clean-up), but it is totally worth it, especially if you're like me, and Fall is the most wonderful time of the year!

Recipe
IngredientsFor doughnuts:
- 1 1/2 C apple cider, reduced to 1/4 C and cooled
- 3 1/2 C flour, plus additional for cookie sheets, and dough
- 2 tsp baking powder
- 1 tsp baking soda
- 1/2 tsp salt
- 1 tsp cinnamon
- 1/2 tsp nutmeg, freshly grated
- 1/2 stick butter, softened
- 1 C granulated sugar
- 2 eggs
- 1/2 tsp vanilla
- 1/2 C buttermilk (clabber 1/2 C milk with 1/2 tsp lemon juice or white vinegar for 10 minutes)
- Vegetable oil or shortening for frying
For cider glaze (mix until smooth):
- 1 C confectioner's sugar
- 2 tbls apple cider
For cinnamon sugar:
- 1 C sugar
- 1 tbls cinnamon
Directions
- Reduce apple cider to 1/4 C, and set aside to cool
- Combine all dry ingredients (flour, spices, baking powder, baking soda, salt) in a bowl and set aside
- Cream butter and sugar until light and fluffy
- Add eggs one at a time and mix until just combined
- Slowly add the reduced cider, buttermilk and vanilla on low, and beat until just combined
- Add the dry ingredients in 2-3 additions, mixing until just combined.
- Turn dough out onto a parchment-lined and floured cookie sheet, and pat down until it is 1/2" thick
- Freeze for 30 minutes
- Cut out doughnuts and holes with chosen cutter, and transfer to second parchment-lined and floured cookie sheet
- Place doughnuts in refrigerator for 30 minutes
- Heat oil to 350F-365F
- Gently place one or several doughnuts and/or holes in the oil to fry. Fry the first side 30-60 seconds until golden brown, then flip and fry the other side an additional 30-60 seconds.
- Remove with steel mesh frying skimmer onto a paper towel-lined cookie sheet and allow to blot. Repeat for all doughnuts and holes.
- Assemble toppings and dip the warm doughnuts into the topping of your choice (can dip tops only or entire doughnut)
Happy Baking!
Obligatory Daring Bakers blog check line: " The October 2010 Daring Bakers challenge was hosted by Lori of Butter Me Up. Lori chose to challenge DBers to make doughnuts. She used several sources for her recipes including Alton Brown, Nancy Silverton, Kate Neumann and Epicurious."
No comments:
Post a Comment