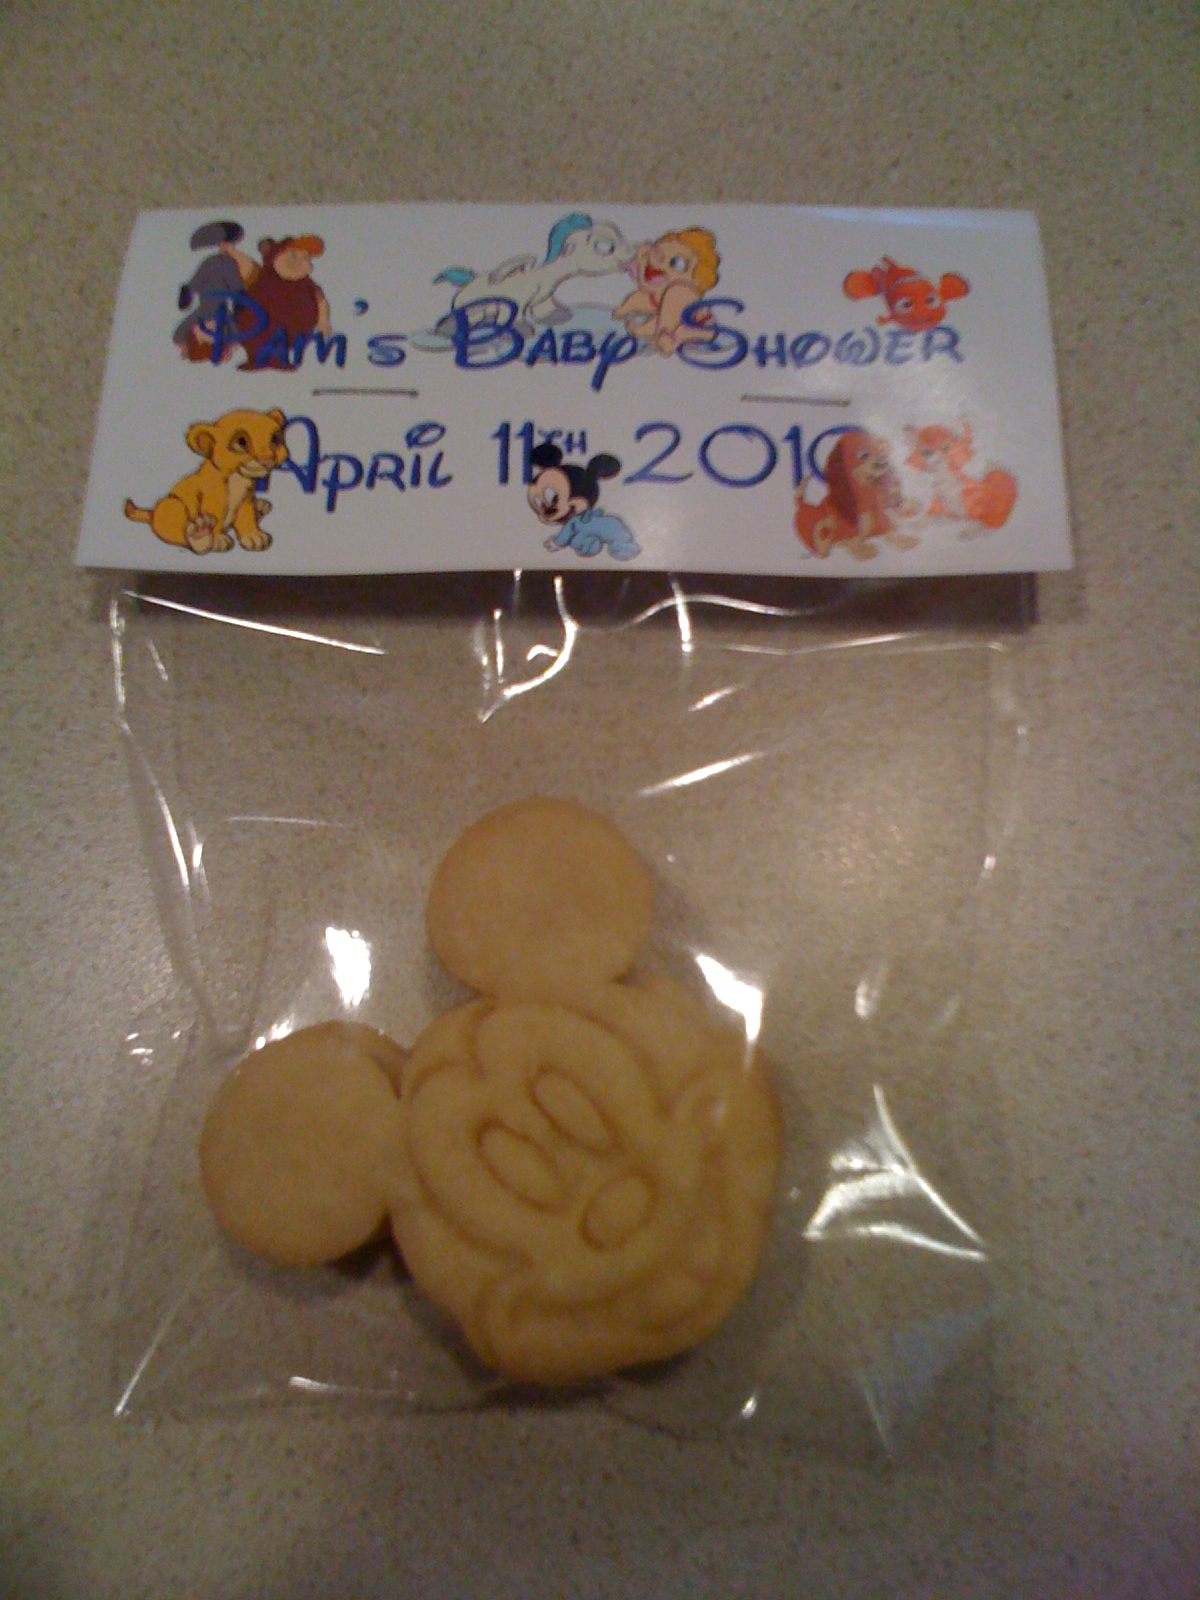
I have now made cookies favors for two different events, both baby showers. The first was for my cousin, where I baked up really cute Mickey Mouse sugar cookies, and packaged them to be consistent with the Disney theme that her mom chose for the shower.

The second were the Grover Cookies of my previous post, which were for my friend Allie's baby shower.

Since the process of making these favors was pretty much the same both times, and since it really can be applied to almost any favor that you would like to make, I thought a separate post that just talked about favors and favor packaging might be useful to some people wanting to create tidy-looking favors for an event. The two examples I have listed here are both edible, obviously, but this method of packaging can also be used for non-edible favors, if you like the look.
The Favors
Let's start from the beginning: what to make? Cookies are an obvious choice, but candy, cake balls, mini-cakes, muffins, and even cupcakes (depending on the icing) are also potential choices with this type of packaging. Is there a theme, be it colors or characters?
Whatever you choose, just keep in mind that, depending on the size of the function, you might be in for a lot of work if you choose a favor that is too complicated to make. So put some thought into a few things: 1) How many do you have to make (accounting for a few extras)? 2) How complicated are they to make? 3) Do they need to be decorated, and if so, how long will that take? 4) Can they be made in advance? 5) If so, how feasible is it to store them (i.e. how much room do you have in your freezer)? 6) Are they something that can stay out at room temperature for a considerable length of time post-packaging (at least a day or two)?
Number 6 is particularly important, because this dictates how far in advance you can package the favors.Something like Oreo Balls would be exceptionally delicious as favors -- buuuuuut they have cream cheese in them and are thus perishable. So if you want them as favors, you either have to package them the day before and find space in your fridge for all the favors in their packaging, or you have to commit to packaging them just before you leave when it will probably be highly inconvenient to do so. And then, they will be sitting at room temperature for an indeterminate length of time (some people might not eat theirs during the party, or even the same day, for that matter), so you'll have to run around encouraging people to gobble down their favors before they leave the party, lest they get sick later. My best advice, therefore, is to choose something that will freeze well, so that you can bake it in advance. Something that isn't too complicated to decorate, especially if you have a lot to make. And, finally, something that is perfectly stable at room temperature, so that you can package them a day or two in advance, pack them in a travel box, and leave them there until it is time to bring them to the party. It might not be exactly what you pictured in your head when you first start mulling over ideas for favors, but trust me, this advice will reduce your stress-level by at least ten-fold.
One of my favorite ways to make favors is to use a stamp cookie cutter -- one of those cookie cutters that comes with a little stamp that leaves a design in the dough. My Micky Mouse cookie cutter for my cousin's shower was a stamp cookie cutter.
(I apologize in advance for the quality on some of the Mickey Mouse pictures, I don't know what is going on with my phone -- the details on the cookies themselves were clear as bells)

First you use the outer cutter to cut into the dough:

Then you use the inner stamp to create a darling little imprint in the dough which will still be visible after baking:


Some cookie cutter sets also come with texture maps as an alternate way to press a design into the dough. The great thing about these types of cookies is that the imprint itself is a decoration, so you don't necessarily have an additional step for decorating if you don't want it. For the Mickey Mouse cookies, I left them as-is and packaged them up.

Alternatively, if you intend to decorate the cookies with royal icing or something like that, your job just got a whole lot easier, because now you have lines to trace and you don't have to freehand it! A quick Google search will bring up hundreds of options like these. My personal favorites are the Star Wars Cookie Cutters from Williams-Sonoma. They have two sets, Heroes and Villains and Vehicles, and I own (and am in love with) both of them. How cute would those be, all packaged up for a birthday party??
In the case of the Grover cookies, they were frosted and dipped in sprinkles -- nothing crazy.

The Grovers weren't from-scratch dough, they were slice-and-bake, and you know what? Everyone just loved them, and thought they were both adorable and delicious. Remember, you're making these out of love for someone, so don't be afraid to make some decisions that ease some of the stress on yourself, too!
The Labels
Even though I have Labels and Packaging listed separately, you have to think about them together to some extent, at least for sizing, because they are a pair. The labels on my favors are folded over the tops of the bags and stapled on. So, the first question is: what size labels do you need to make? And in order to answer that question, you need to know what size bag you want to use.
For most things you will make, the best cellophane bag size to buy will be 4"x6" -- that should accommodate most things you would make. So, let's use that as an example, with the understanding that you can scale it up if you need a bigger bag.
Aesthetically, I think a set up where the favor is 1/3 label and 2/3 bag is the most pleasing to the eye. For a 4"x6" bag that is 6" long, this means that you want the label to hang down 2 inches. Since the label will be folded in half horizontally over the top of the bag, figure 4 inches of height in order to get a 2" overhang on either side of the bag. Your bags are also 4" wide, so you will need a template that is 4.25"x4.25" (I always put a little extra on, so that the label extends past the sides of the bag ever so slightly, the last thing you want is a label that is more narrow than the bag).
PowerPoint is a great option to make the labels in, if you have access to it, because you can freely move around words and text. Open a blank PowerPoint slide (in '07 version) and go to Design -> Page Set Up and select "Custom" in the pull-down menu, while making the Height and Width both 4.25". Click show ruler, and keep in mind that the horizontal zero is the axis the label will be folded on.
Now, make one half of the label with a mixture of fonts and pictures. There are plenty of fonts available online to tie into a theme. The font below on the Disney label was Waltograph. Once you have one side made, decide if you want the second half to be exactly the same, or if you want different things on either side. If you are doing the same combo of pics and text on both sides, it is easy to get it over to the other side. Select all of the pics and text on one half of the label, then go to Arrange -> Group together. Then, you can select the entire group, and go to Arrange ->Rotate -> Flip Vertically and Arrange ->Rotate -> Flip Horizontally. If you are using different pics (like I did below), you can do this with just the text, and arrange the pictures by hand. You end up with something like this:
 and
and

Now, if you select the label, and hit the Shape Outline option, you can outline the labels in a very light grey, this will really help when you are cutting them. Then you can print them out, maybe 4 or 6 to a sheet -- regular paper is fine, but you can also use something more sturdy like card stock or photo paper. Cut them out with scissors or slice them out with a paper slicer, and the labels are all set!
The Packaging
I am very concerned with freshness. So I opt to heat seal the favor bags before putting the labels on, using one of these, an impulse heat sealer:
 These things are great! In order to activate the heat, there is a little metal piece under the handle that needs to connect to the screw at the end of the sealer, so it is only hot when you are sealing something. They run about $35-45 depending on the size you get. Mine is an 8" sealer, but if you want it for larger projects, they have sizes up to 16".
You set the length of exposure with the knob in the front. I have found Level 2 to be perfect for the Wilton 4"x6" cellophane bags, but you might have to play around a bit to find the sweet spot for sealing the bags you bought. Here's how it works:

Now you can fold and staple on those labels, and you have these:

Beautiful favors in nice neat little packages! And the best part is, you can use the same basic process again and again to make favors unique to each event!


The second were the Grover Cookies of my previous post, which were for my friend Allie's baby shower.

Since the process of making these favors was pretty much the same both times, and since it really can be applied to almost any favor that you would like to make, I thought a separate post that just talked about favors and favor packaging might be useful to some people wanting to create tidy-looking favors for an event. The two examples I have listed here are both edible, obviously, but this method of packaging can also be used for non-edible favors, if you like the look.
The Favors
Let's start from the beginning: what to make? Cookies are an obvious choice, but candy, cake balls, mini-cakes, muffins, and even cupcakes (depending on the icing) are also potential choices with this type of packaging. Is there a theme, be it colors or characters?
Whatever you choose, just keep in mind that, depending on the size of the function, you might be in for a lot of work if you choose a favor that is too complicated to make. So put some thought into a few things: 1) How many do you have to make (accounting for a few extras)? 2) How complicated are they to make? 3) Do they need to be decorated, and if so, how long will that take? 4) Can they be made in advance? 5) If so, how feasible is it to store them (i.e. how much room do you have in your freezer)? 6) Are they something that can stay out at room temperature for a considerable length of time post-packaging (at least a day or two)?
Number 6 is particularly important, because this dictates how far in advance you can package the favors.Something like Oreo Balls would be exceptionally delicious as favors -- buuuuuut they have cream cheese in them and are thus perishable. So if you want them as favors, you either have to package them the day before and find space in your fridge for all the favors in their packaging, or you have to commit to packaging them just before you leave when it will probably be highly inconvenient to do so. And then, they will be sitting at room temperature for an indeterminate length of time (some people might not eat theirs during the party, or even the same day, for that matter), so you'll have to run around encouraging people to gobble down their favors before they leave the party, lest they get sick later. My best advice, therefore, is to choose something that will freeze well, so that you can bake it in advance. Something that isn't too complicated to decorate, especially if you have a lot to make. And, finally, something that is perfectly stable at room temperature, so that you can package them a day or two in advance, pack them in a travel box, and leave them there until it is time to bring them to the party. It might not be exactly what you pictured in your head when you first start mulling over ideas for favors, but trust me, this advice will reduce your stress-level by at least ten-fold.
One of my favorite ways to make favors is to use a stamp cookie cutter -- one of those cookie cutters that comes with a little stamp that leaves a design in the dough. My Micky Mouse cookie cutter for my cousin's shower was a stamp cookie cutter.
(I apologize in advance for the quality on some of the Mickey Mouse pictures, I don't know what is going on with my phone -- the details on the cookies themselves were clear as bells)

First you use the outer cutter to cut into the dough:


Some cookie cutter sets also come with texture maps as an alternate way to press a design into the dough. The great thing about these types of cookies is that the imprint itself is a decoration, so you don't necessarily have an additional step for decorating if you don't want it. For the Mickey Mouse cookies, I left them as-is and packaged them up.

Alternatively, if you intend to decorate the cookies with royal icing or something like that, your job just got a whole lot easier, because now you have lines to trace and you don't have to freehand it! A quick Google search will bring up hundreds of options like these. My personal favorites are the Star Wars Cookie Cutters from Williams-Sonoma. They have two sets, Heroes and Villains and Vehicles, and I own (and am in love with) both of them. How cute would those be, all packaged up for a birthday party??
In the case of the Grover cookies, they were frosted and dipped in sprinkles -- nothing crazy.

The Grovers weren't from-scratch dough, they were slice-and-bake, and you know what? Everyone just loved them, and thought they were both adorable and delicious. Remember, you're making these out of love for someone, so don't be afraid to make some decisions that ease some of the stress on yourself, too!
The Labels
Even though I have Labels and Packaging listed separately, you have to think about them together to some extent, at least for sizing, because they are a pair. The labels on my favors are folded over the tops of the bags and stapled on. So, the first question is: what size labels do you need to make? And in order to answer that question, you need to know what size bag you want to use.
For most things you will make, the best cellophane bag size to buy will be 4"x6" -- that should accommodate most things you would make. So, let's use that as an example, with the understanding that you can scale it up if you need a bigger bag.
Aesthetically, I think a set up where the favor is 1/3 label and 2/3 bag is the most pleasing to the eye. For a 4"x6" bag that is 6" long, this means that you want the label to hang down 2 inches. Since the label will be folded in half horizontally over the top of the bag, figure 4 inches of height in order to get a 2" overhang on either side of the bag. Your bags are also 4" wide, so you will need a template that is 4.25"x4.25" (I always put a little extra on, so that the label extends past the sides of the bag ever so slightly, the last thing you want is a label that is more narrow than the bag).
PowerPoint is a great option to make the labels in, if you have access to it, because you can freely move around words and text. Open a blank PowerPoint slide (in '07 version) and go to Design -> Page Set Up and select "Custom" in the pull-down menu, while making the Height and Width both 4.25". Click show ruler, and keep in mind that the horizontal zero is the axis the label will be folded on.
Now, make one half of the label with a mixture of fonts and pictures. There are plenty of fonts available online to tie into a theme. The font below on the Disney label was Waltograph. Once you have one side made, decide if you want the second half to be exactly the same, or if you want different things on either side. If you are doing the same combo of pics and text on both sides, it is easy to get it over to the other side. Select all of the pics and text on one half of the label, then go to Arrange -> Group together. Then, you can select the entire group, and go to Arrange ->Rotate -> Flip Vertically and Arrange ->Rotate -> Flip Horizontally. If you are using different pics (like I did below), you can do this with just the text, and arrange the pictures by hand. You end up with something like this:
Now, if you select the label, and hit the Shape Outline option, you can outline the labels in a very light grey, this will really help when you are cutting them. Then you can print them out, maybe 4 or 6 to a sheet -- regular paper is fine, but you can also use something more sturdy like card stock or photo paper. Cut them out with scissors or slice them out with a paper slicer, and the labels are all set!
The Packaging
I am very concerned with freshness. So I opt to heat seal the favor bags before putting the labels on, using one of these, an impulse heat sealer:

You set the length of exposure with the knob in the front. I have found Level 2 to be perfect for the Wilton 4"x6" cellophane bags, but you might have to play around a bit to find the sweet spot for sealing the bags you bought. Here's how it works:
- Put the favor in the bag.
- Set the sealer to the proper level
- Line up the edges of the bag a bit -- it doesn't have to be perfect, this will be covered by the label anyway.
- Drape the bag over the bottom of the element, try to make it straight. Make sure that you are positioning the seam somewhere that will be covered by the label.
- Bring the top of the sealer down over the bag, and press down with the handle. This will complete the circuit and the sealer will turn on. The little red light above the knob will go on, and the machine will hum.
- When the light goes back off (just a few seconds), the machine has done its business, but don't go lifting the handle immediately, you need to give the bag a few seconds to resolidify, so count to four first (as in one thousand one...etc).
- Gently lift the top lever up. Most likely the bag will be stuck to the top.
- Gently peel the bag off of the top, and voila! Heat sealed favors!


Now you can fold and staple on those labels, and you have these:

Beautiful favors in nice neat little packages! And the best part is, you can use the same basic process again and again to make favors unique to each event!


3 comments:
How far in advance do you usually make your cookie favors? And, is there a difference in your mind between how long we can keep the frosted vs. non-frosted? Thank you.
How far in advance did you make these favors, and what is your recommended "keep" time? Does it matter frosted vs. non frosted?
Hi Kay,
These cookies are not vacuum-sealed, just heat-sealed, so I'm not 100% sure. Both sets of cookies were packaged 2 days before. I think that the Grover cookies would last at most one more day, because the icing we used was ready-made, and I'm not sure it lasts at room temp much longer than that. If you used royal icing instead of the icing I used, I think both plain and royal-iced sugar cookies could last at least 3-4 days packaged. I'm not sure if I'd go a week, but I've never tried.
Post a Comment